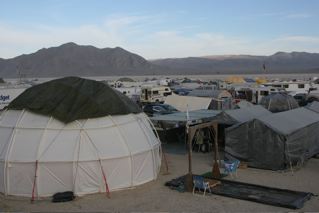
Gary Gabrel: I bought a 30′ dome from you last year, and you built in a special door for me so that I could attach it to my large RV, at least that’s what I planned to do with it at burning man, but I didn’t. We did get it up and it worked well.
However, getting the assembly started was not easy. We had to go down the street and eye-ball an standing dome. Is there some direction you can give me on how to start the assembly process, getting the initial patterns right?
Also, FYI, it to 3 people working pretty damn hard to get the struts bent and inserted; there were a lot of times we were wishing the tubes we a 1/2″ shorter.
Bob Gillis: As to putting the 31’er up. It is best to start with the top center (should be marked) but you can start with other connectors near the top center. Work out from this clip one pole at a time walking around and around the covering. The poles will form squares except in a few places were there are triangles. A print showing the dome should help. It does take strength to put it up but with out the tension the dome would be weak. But it is a beast. I put one up by my self once, if you can believe it. It is easier the second time: the covering stretches out a bit and the poles take a slight set.
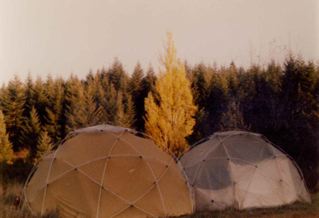
Francie and I lived in these two domes over a winter on the side of Mary’s peak in Oregon. With a little camp stove, some straw for insulation and rugs on the floor we were quite cozy in the fabric dome. The plastic one was the dog house/woodpile, storage area.
As you can probably tell these are the fiberglas pole 16′ great circle designs with an earlier version of the clip. The fabric dome served us well for many years, being put up in the back yard and various adventures across the country. The picture with the trucks is from Idaho somewhere.
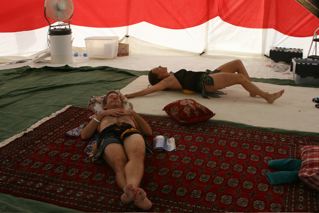
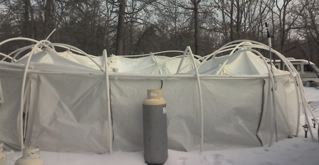
The dome has been really wonderful, we just love it. As I mentioned in our telephone conversation, we used the grip clips around the third band of poles to clip in a marine tarp roof. Our dropped ceiling was an effort to heat less ceiling space.<
Our cave in would have resulted in just a bit of ice on our bed if the ceiling had not been there. Instead the weight of the sleet and ice on the tarped ceiling buckled the entire structure.
Here are some pics. The one during the sleet storm. His efforts to keep digging the snow out helped release some of the pressure. We look forward to getting it back up for the spring.

I’m the happy owner of an 18′ for three years. I’ve lived in it full time in California ( see photos from San Diego nspr ). Your Dome is famous in San Diego!
Now I’ve moved to New Hampshire and I want to use it here…in the summers at least.
Hi, I thought it might be time to write my testimonial of dome living. Two summers ago I ordered two domes, one 20 ft the other 14. The larger one we used for main living space the smaller one was my teenage sons bedroom. They were great they stayed dry and held up to some big winds and lots and lots of heavy rain. The larger one was a greenhouse version I had choosen because I knew I wouldn’t be living in it forever and I wanted a greenhouse too. IT was like being inside a waterfall in the heavy rain but not a bit of dampness enterred as long as we were sure to keep the doors secure. I was wooried when I first saw the domes, I’ll admit. I had just spent a great deal of money on fine furnitur and I did not want to risk it in the elements. It is still in top condidtion and made dome living quite comfy. Shades were an absolute necessity it was Very hot when the sun hit and quite cold when the sun went down, I recommend getting a heat source. I also installed floors in both shelters it helped keep things clean and dust free. There were some awesome things about dome living first of all every night I could hear the frogs singing in the pond nearby, secondly I woke up every morning to the sounds of birds singing. A newt moved in with us and lived under the refridgerator, we only saw it once and thought it had gone back to the pond but when we moved the refridgerator it was living there. Always tie down the dome!!!! This past summer I used the greenhouse one as a green house and we forgot about the cross over lines when we set it up. One day the big winds came and blew it right off the top of our mountain down into the gully at my neighbors. The dome was not hurt even though it blew about a quarter mile away and landed squarely in a hawthorn bush. I was grateful it did not hit my neighbors new vehicles though. ALWAYS tie down the dome. We set the small one up at the local barter fair and low and behold we met another family of dome dwellers. They told me they set theirs up on a nearby mountain and spent the sprng, summer, and fall in it quite nicely. We have to much snow here for dome living in winter but I am hoping to travel next winter and set them up on the beach in so cal and mexico. So happy dome dwelling to all.
If I set the domes up this year I will email photos. I don’t have any photos from when we lived in them. I have a picture of us at the fair with the dome behind but it is a regular picture not digital. I would not hesitate for one minute to move back into the domes if we didn’t get such heavy snowfall. I have been seeing some nice tent wood stoves on ebay reasonably priced as well as vent free propane both would be great additions to dome living. You guys should develop a dome shower house too. Something with black material so it warms up, brrr those outdoor showes can be so cold. Thanks we had a great time as dome dwellers and we still have great conversations about it. I love that they are also being used for relief efforts, that is so important these days. Take care and god bless.
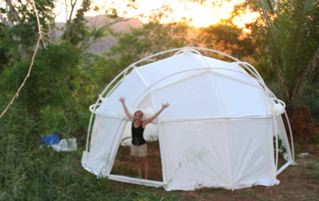
I had a wonderful time working together to set up an 18 foot YurtDome on a beautiful piece of land in costal San Pancho Mexico.
It will be a storage and hang out place while we build a small palapa house and when building is complete, we plan on keeping it up for an extra room and a shelter for hanging out in on the beach.
It looks really beautiful up in the jungle, the ventilation is great and a sun shade or two will help on hot sunny days.
Here she is on her maiden voyage will send you more when she iHere she is on her maiden voyage will send you more when she is better dressed! Hope all is good with you. We are very happy with her. Thank you.
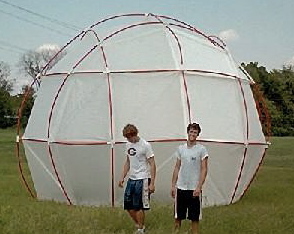
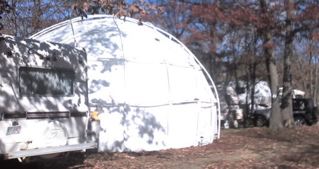
My company is working on systems to make biofuel from algae. We needed a large spherical dome to act as both greenhouse and reflector. It also had to be easy to assemble and transport.
From previous domes we had bought from you, we knew you could make what we needed. It arrived and we assembled it in a hour. It performed as planned. The tests were moving ahead until… The tornado hit.
We will be calling you again soon.
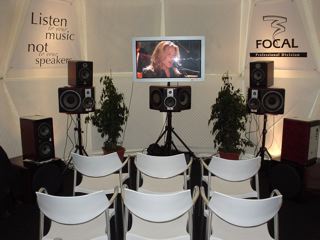
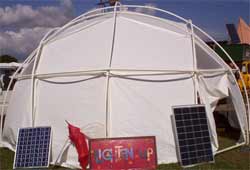
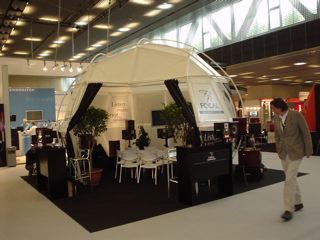
Here are some pictures of our European booth using your bubble dome. that is why we have just ordered the same product for the north american territory.
One of your wonderful shelters was at the National Association of Music Merchants show in Anaheim last week.
Looked fantastic. Was the FocalProfessional.com booth…and stood out very positively amongst all the rest. The guys there were surprised I knew all about it. They said they had received lots of inquiries about it… And that they loved it because it went up and down so fast and had lots of surface area to hook things on.

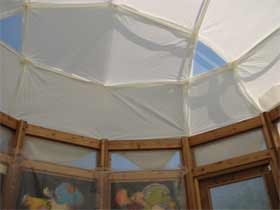
Julie N. Rokke: Good Morning Bob. Here are some pictures of the chapel. We had to cut about 15 inches off the bottom legs. Now we are thinking that we need to have a bottom ring and we need to seal up the door openings. Any advise?
Good morning to you also.
Robert: Your top looks good.
You can “clip” the doors closed by unclipping the side wall after removing the poles from the clip and then layering in the door over the side wall and clipping the two together.
You can add a bottom ring in one of two ways. Use 20′ lengths of PVC class 200 to create a ring and tie this to the base clips; or tie connectors of 1.25″ to your base clips and then add poles between the connectors to create the ring. The pole lengths will be slightly shorter then your long poles and the bottom door pole may be shorter still.
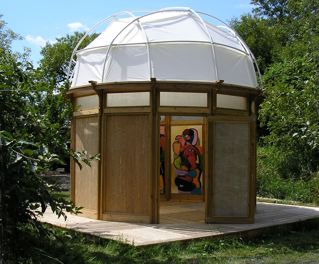
Julie N. Rokke: The chaplet is complete and the initial opening with all of the different chaplets happened on August 1st. The artist is now considering how to travel the chaplets around the state etc etc. We talked yesterday about maintenance and repair and I was thinking that perhaps we should have another fabric roof as a back-up. It would have to be modified because we cut off the structure you sent me etc etc. Is this something that you think you could do? What we did was cut the “legs” off 15 inches and then we took the grip clips apart to attach the door panels permanently and added a bottom ring to the structure. We also added an additional grip clip at the center of the fabric panels and attached it to the bottom ring ,just to pull it tighter to the roof structure. The spacing around the bottom was not equal, the window panels ended up being shorter so it didn’t work out quite as well with the brackets so we ended up adding a wood trim ring around the top of the bracket to hide the ring.
Robert: Sorry for the delayed response. I wanted to make sure the artist was okay with it. She is… so yes you may use the photos on your web site. It would be nice if you could identify the project as Roberts Street Chaplet Project. and list me as the architect. Thanks.
Julie N. Rokke: I think we’ll try to order another roof structure, but it might wait a month or so.
Thank you again for all your help. The Chaplet has been up now for better than 6 weeks and has weather some nasty thunderstorms.