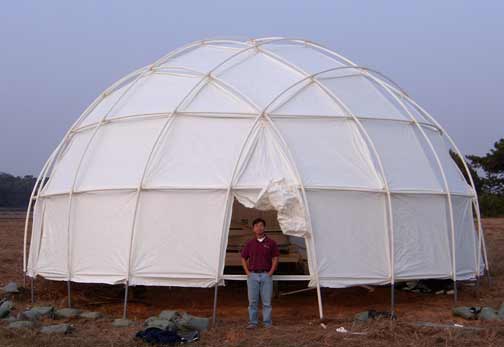
This Instruction Manual explains in detail how to erect 30′ and 32′ Shelter Systems’ domes and structures, including selecting a site, assembling the dome, preparing the flooring, anchoring the dome, controlling the dome’s environment, storage repair and accessories. We suggest you briefly preview the manual before you begin to assemble your dome. Note: “dome,” “yurt,” “yurt dome,” “tent,” and “greenhouse” are used 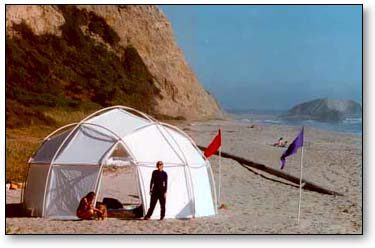 interchangeably throughout this manual.
© 2007 Shelter Systems All Rights Reserved
WARNING: DO NOT COVER SHELTER WITH A TARP. Tarp can fill with rain and collapse shelter. Tarp may heat poles till they deform.
Parts List: Yurt-Dome’s ™ Canopy, Yurt-Dome’s ™ Poles, Stakes, Strings for stakes, Manual, Vent tubes, Binder clips for doors, Guy lines and Spare parts.
Site Selection: Carefully select a site for your yurt. A good site can make the difference between a wonderful stay or a miserable one. Take time to look around for the best drainage, wind protection, sun and shade exposure, and a level and smooth surface. Do not set your yurt under a tree or branch that might fall on you.
Wind and Snow Warning: Your dome is a lightweight structure, therefore extreme wind sites are not recommended. When possible, avoid exposed hilltops and narrow valleys where wind speed increases. Trees and  brush between you and the wind help protect your shelter. Your dome could be destroyed in extreme weather and your life or safety could be at risk. In heavy snow or wind your dome could collapse, damaging what you have or compromising your shelter. Do not rely on your dome as your only shelter. Accumulated snow, must be melted or shaken off.
An Earthen Floor takes less time, energy, and money than a deck. When properly mounded and ditched, an earth floor will remain dry in the worst rains. Also an earth floor does not require insulation since no cold air can come from under the dome.
Most of us have lived our live in a house, so living on the ground does not come intuitively to us. We think living on an earthen floor would be wet, cold, and damp. However, if you choose your site carefully and prepare the earthen floor properly, the earthen floor will be drier, warmer and always much cheaper than building a wooden deck. It requires time and effort to build a deck and make it function properly, so that rainwater doesn’t flow into the dome, so it’s attached properly to its foundation, and so it’s adequately insulated against cold. You need to have carpenter skills, aptitude, ambition, and/or a good book on building decks. Of course, a deck would be a better floor in some situations, such as on a very steep slope or on boulders or volcanic rock you can’t easily move, or if you want to elevate the dome.
Drainage and Leveling: Ideal drainage occurs when rainwater can flow down and  away from a raised site such as a hill top. All rain will then flow away from your yurt. If your site is in a meadow or a place that does not drain well; create small mound of earth for your yurt to sit on that is about 1′ high. Slope the mound so that rain will run away from the edge of your yurt. If your site has a slope to it, create a level space big enough for your yurt. Mark a circle on the site with your shovel by digging a shallow trench. Then mark a line that divides the circle in an up hill half and a down hill half. Now move the soil that is uphill to the downhill side of your line so as to create a level spot for your yurt. Dig a 6″ ditch on the uphill side so the rain can drain into it, around your floor and on down the hillside. Remove roots, lumps
  and rocks from where your yurt will sit. After you have walked on your floor for about three days, fold your floor in half exposing the earth under it. Take a shovel and carefully remove bumps and put the dirt in the low spots. Fold the floor back and do the other half. Do this again in about 2 weeks. This procedure will produce an earth floor that is level and comfortable.
Floor Covering: Always install a waterproof floor covering in your dome to keep the  dampness of the earth from entering your living space and condensing on your walls. Shelter Systems sells a circular, high grade waterproof floor, made from our woven film, to fit your dome with Grip Clips to attach it to your domes’ wall. Plastic tarps can also be obtained from a hardware or sporting goods store and you can purchase Grip Clips from Shelter Systems. Spread the floor out evenly inside the dome. The edge of the floor should go up several inches against the inside walls. If you wish to tie in your floor, attach clips a few inches in from the edge of the floor. Thread string through one hole on the underside of each floor clip. Then thread it through one hole on the inside of a corresponding dome clip. This is easier if you use a tool like a crochet hook or a needle nose pliers to grip and pull it through. Pull tight and tie.
Sticky back Velcro and be used to create a tighter seal of the floor to the wall. Make sure the floor and tent covering are clean and dry before applying the Velcro.The one way to attach the Velcro to your net doors is to first secure the floor to the walls of your tent as described above. Use a marking pen to mark where the edges of the floor contacts the sides of the tent. Move the floor to get it out of your way. Now measure and cut a length of “hook” Velcro long enough to secure one of the floor’s edges. Remove the protective strip from the sticky back and apply this Velcro to the underside of the mark you have made on the side of the dome. Repeat for other sides of the floor. Take lengths of “loop” Velcro and Velcro them to the “hook” Velcro that you have already attached to the sides of your tent. Remove the protective strips from these. Now carefully lift and hook your floor to the sides of the dome. Press the floor to the exposed sticky of the Velcro. Rub well to secure the bonding of the glue to the floor and the sides of your Yurt Dome.
Rugs can be placed on top of your waterproof floor.
Decks: There are many ways to build wooden decks. If you are not comfortable with construction, consider getting help. Some provision needs to be made to prevent rain from  following the wood decking into the living space. We suggest you start by making your deck one foot bigger than your dome’s diameter. Then set up the dome on your deck and position it how you want it. Trace around the perimeter of your dome onto the deck. Remove the dome and cut the decking along the line you marked, but not through the joists that are under the decking. Because poles of the repositioned dome will not align exactly with the protruding joists, you will need to cut some 2″x 6″ supports for the poles to sit on.
(Measure the distance between each pair of joists under the cut deck.) Now secure the measured sections to the joists. Place the dome back on the deck and anchor your dome with “eye” bolts to the 2″x 6″ sections. Now, rain running off the dome will run onto the 2″x 6″s that you  have attached under your deck and not onto the deck and into your dome.
Here is an example of a way to construct a deck for a 20′ dome built of 2″x 6″ Douglas fir and plywood. It has 12 equal sides. The spacing for the joists is 2′. Use joist hangers. Support underneath with 4″x4″s toe-nailed into foundation piers placed under each joist’s ends and several under the central joists. Extend the dome’s skirt (with plywood or plastic) to the ground to block cold air from coming up under the dome. More on deck building see our online manual.
Assembling Your Dome: Wear eye protection and gloves for safety. Have two strong friends help you set up your dome. Start by setting aside your (8 for the 30′ or 12 for the 32′) short poles from your pole set. Spread the dome on top of your floor or a large tarp so that the dome’s connectors are visible and the top of the dome (marked with a strip of fabric). Take care that your dome’s covering is not pinched between your domes poles or connectors and any hard surface, such as concrete, asphalt or rocks, as the dome’s covering could be cut. If you must set up your dome on a hard surface then, at all times, keep the covering tucked under the dome away from the thrust of the poles.
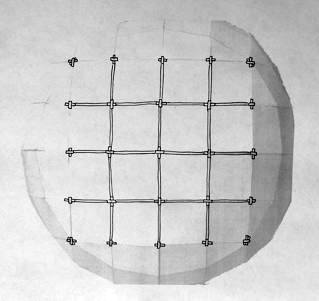
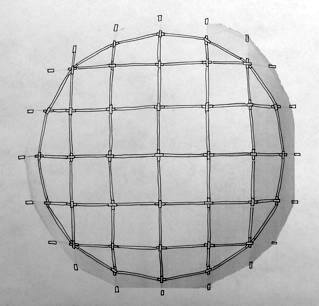
Taking one pole at a time, insert it into one connector at the top of the dome. Insert the other end of the pole into a connector outward from the center of the dome. Insert the next three long poles from the center outward. You should now have formed an X at the top of the dome such that there should only be a little slack in the covering under the poles. Continue bending and inserting long poles working out and down from the top. Note: it does not matter which connector is on top and which is underneath; random is best; however if the poles seem unusually tight you might try switching the order of the connectors.
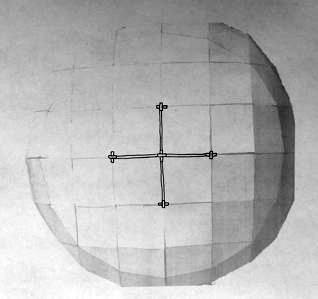
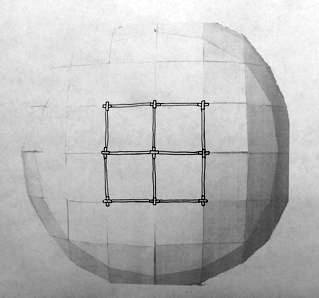
Here you can see we have added the first 4 long poles creating an X with 4 poles that radiate out from the top center clip’s two connectors. Now with 8 poles create a 2 by 2 grid of regular squares by adding the 8 poles around the first 4 poles. As more poles are added, the canopy will become tighter requiring that you bend the poles and pull on the connectors to fit the poles in place.
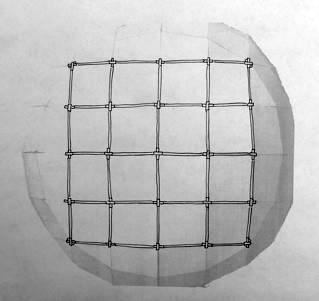
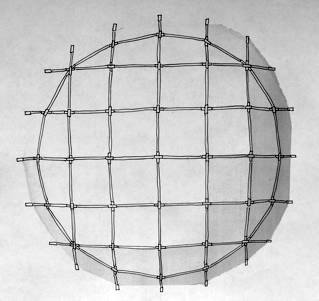
Continue working out from this 2 by 2 grid by adding 12 poles. Each of these 12 poles points away from the center. Enclose these poles with 12 more poles to create a 4 by 4 grid of squares.
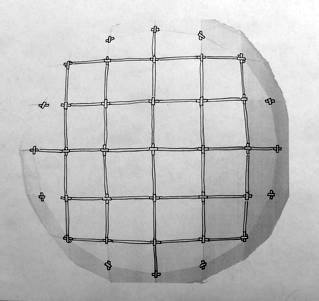
At each of the extreme 4 corners of your 4 by 4 grid you will find that there are three connectors attached to each of these 4 clips. Six poles will eventually intersect at these 4 clips which each have 3 connectors instead of the standard two; but do not add these additional poles at this time. First add one long pole to the middle of each of the 4 sides of your 4 by 4 grid. Next add one short pole to each side of the one long pole you added in the last step. Now you should have a total of 12 poles (4 long and 8 short extending out from the 4 by 4 grid.
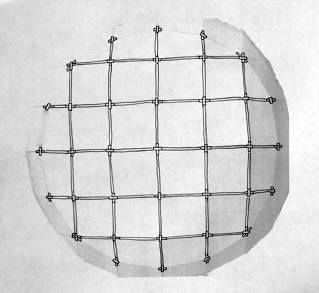
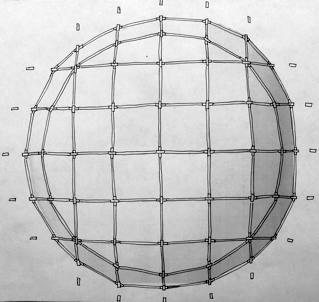
Next add a ring of 20 long poles. Then 20 more that radiate out towards the ground. If you have a 30′ Dome, Yurt or GroDome then you are done. If you have a 32′ then continue to add poles as show below.
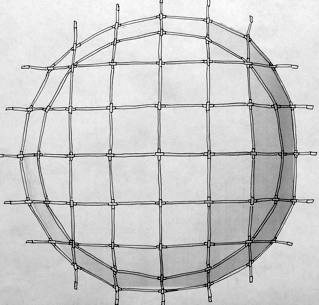
Now add 4 short poles radial out from the 3 way connections. If you have trouble inserting any of the short poles, remove the long poles adjacent to the window panels and then insert the short poles first. Then fill in the ring with 16 more long poles. Next extent outward with 20 long poles to complete the 32′ YurtDome or GroDomes

This may sound and look complicated but the simple fact that you can not place a pole where there is no connector allows the construction of the dome to be a matter of adding one pole at a time while continuing to work out from the top center of the dome. Also, you can not fit a long pole where a short one is to go as there is not enough covering under the connectors to allow it to fit.
Tricks for tube bending: The 30 and 32 foot Yurt Domes are the most difficult to put up. Make sure you have two strong people working on it. If you have trouble bending the poles try one or more of the following:
See attached photo; also try inserting the upper end of the pole first then the lower. One technique is to insert a leg between the dome and the pole to use the body to help bend the pole. Another is to use the lower connectors as a lever to pry the pole into it. Try having your help pull out on the middle of the pole to bend it (being careful not to pull so hard that the pole kinks) while you pull on the connector, that the other end of the pole is to go into, to stretch the dome’s covering underneath the pole.
To get a pole to arch, fit one end of it on to a connector, then grab the pole in the center and pull outward from the dome. Simultaneously push the other end of the pole inward . At the same time, put this end in the next connector.
Note when putting up your dome in the cold: The poles of the dome are made of PVC, a thermo plastic, which gets stiffer with the cold. In putting up the dome the poles are bent and inserted into connectors. It is preferable that the domes be set up during the day when the air temperature is warmer. Poles may be kept warm by wrapping them in a blanket with several large bottles of boiling hot water. Once the poles are warm remove and insert them one at a time from the blanket. If the domes are set up in the extreme cold with out warming the poles some may break. This should not be a problem however since we include 4 extra poles with each dome.
After all poles are in, turn your dome so the doors face the direction you want. Hook all the doors closed. (Leave them closed until the dome is anchored.) Your dome knows how to hold itself in a nice circle for staking out the bottom if the doors are closed.
The 30′ Yurt Domes™ are set up as the other domes but require more strength to lift the dome when adding poles. Notice also that the 8 short poles go just above the 8 door openings.
Doors: The fabric strips across the threshold of the doors hold the door openings in their proper spacing. This strip can be cut after staking if it proves to be in the way. However, try to avoid cutting it since the dome’s base will spring out without the strip, and if you move your yurt you will need to reestablish this spacing by moving the stakes towards each other so that your door flaps will overlap your door openings. If your door openings are adjusted to the correct width, the doors should 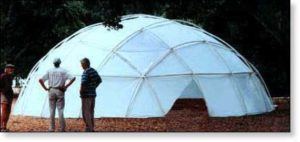 seal without a gap when closed.
A pole can be added to the lower edge of each door to hold the door tight and make it easier to use. The door pole goes over the plugs attached to the corners of each door. One side of the door can be left  hooked closed all the time if you do not need the extra ventilation. This is particularly nice if you’re using a door pole, since it allows the door to swing open and shut easily. In strong winds, hook both sides closed. Binder clips are provided with your dome to secure the doors in wind or when a tight seal is desired. They also work well on net doors. They hold best if you overlap the door and side wall materials a little as you clip them together. If you want more binder clips, you can get them at a stationery store.
  To prop your door open, tuck the tip of the door pole under an adjacent horizontal pole. Of course, if you aren’t using a door pole, just roll the door panel up and tuck it over the pole above the door.
Note: that the 30′ does not use door poles. Door poles come only with the 14′,18′ and 20′. You can rig a door pole for the 30′ with one of your spare poles by drilling a 1/4″ hole .5″ from each end of the pole and tying the two ends to the two clip cords at the bottom of both sides of the door.
Sticky back Velcro can be used to create a tighter seal between the door of your yurt, dome and the wall or net door and wall or to hold the shingling of your dome tight. Make sure the door and wall are clean and dry before applying the Velcro. The one way to attach the Velcro to your doors is to first secure the door closed with the bottom clip hooks. Use a marking pen to mark where the edges of the door cover or netting contacts the sides of the tent. Lift up the door and get it out of your way. Now measure and cut a length of “hook” Velcro long enough to secure one of the door’s edges. You do not need to cover the whole length of the door as this may make it difficult to open or close the door. Remove the protective strip from the sticky back and apply this Velcro to the inside of the mark you have made on the side of the dome. Repeat for other side. Take two lengths of “loop” Velcro and Velcro them to the “hook” Velcro that you have already attached to the sides of your tent. Remove the protective strips from these. Now carefully lower and hook your door o the base of the dome. Press the netting or door to the exposed sticky of the Velcro. Rub well to secure the bonding of the glue to the door and the sides of your Yurt Dome. Try not to stress the Velcro glue bond till it is set as it can take up to 25 hours to reach its maximum holding power. Be sure to attach the “hook” part of the Velcro to the wall of the dome, yurt as this way when you go in and out the hooks will not tend to get caught on your hair or clothing. You can purchase additional Velcro from your fabric or hard where store or you can order more from us.
 Anchoring: Wear gloves and eye protection. Your dome is no stronger than its anchors, so it is important to anchor it securely. We have provided you with short cords so you can drive your stakes deep. Tie them to the base of the attached Grip Clip™ strings around the perimeter of your dome. You now have a long loop to pull out and drive your stake through. To assure the dome’s edge is an even tight circle, place stakes lightly at every other pole base. Then go around pulling, tightening and adjusting the circle, driving the stakes deep after adjustment. Add the remaining stakes. If the stakes we have provided go into the ground easily, then this type of soil requires longer stakes. Make stakes from 2″x 2″ lumber with a hole 2″ from the top. Logs or sandbags filled with sand or gravel work and can be buried for extra security in soils too loose for your stakes to work.
When you put up the dome be wind wise: Even though the dome is freestanding and does not need to be staked out to stand, you should always stake it down as sometimes a gust of wind will come up unexpectedly and grab the dome out of your hands. If you have some one holding the dome against the wind have them hold onto a clip cord not a pole as the wind could cause the pole to be pulled out of the dome’s connectors and again the dome could blow away.
Check your stakes frequently (since ground conditions can change when wet) by pulling on them. You should just barely be able to pull them out. To anchor to a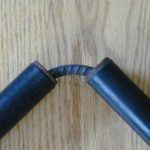 deck, use eye bolts attached to the 2″x 6″s set below the level of the deck.
The best is to avoid the wind by choosing wind protected places to pitch your tent. Of course this cannot always be done. If high wind comes up take your tent down before the wind gets too strong. Next best is to protect your tent from the wind with wind blocks such as snow fencing, bales of hay, buildings, cars, etc. Next make sure you secure your tent to the ground in a way that it will not come loose. Wind over time will cause your tent to move up and down and side to side therefore your ground stakes need to be checked frequently to see if they are working loose Check to see that the cords you run from your tent to the stakes does not become frayed by this friction. If you use re-bar as stakes make sure the ends of the re-bar are covered with bottles or preferably bent into a “U” shape so you will not cut your foot or leg on the exposed bar.
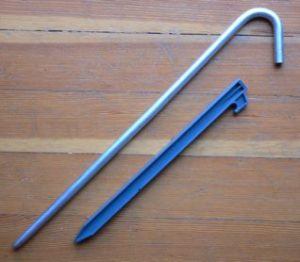 Extra Stakes
All our Yurt Dome and Gro Domes come with a complete set of stakes made of high-impact ABS plastic. They are 12″ long and have excellent holding power in most soils.
Price: $25 for a set of 5. Shipping included.
SuperStakes™
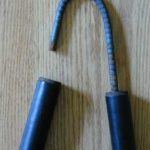
Super strong 18″ galvanized steel stakes for extra holding power. Be sure to face the hook away from the dome and drive the hook so it enters the ground. This will prevent the stake from rotating and releasing its hold on the dome. Use a 3/8″ cord to make a stake loop on the Grip Clip cords to drive the stake through. To remove stake from the ground slip another stake under the hook and lever the stake free.
Price Set of 4 for $32 shipping $10 or $96 for a set of 12 shipping $20
Anchoring in sand:
The best way is with what is called “dead man anchors”: where you bury in the sand a section of a log about 6″ in diameter and 2′ long that has a length of rot proof rope attached to the center of the log. Pull up hard on the rope and if you can lift the log then bury it deeper. You should put up the dome first on a windless day if possible and set it were you want it, to locate where the 12 anchors should be buried. Then move the dome out of the way and bury your anchors.
Anchoring into rocky ground:
 Wear gloves and eye protection. With a one foot section of re bar or a 10″ or 12″ “spike” (large nail) and a heavy headed hammer pound the re-bar or nail into the ground where you want to place your stake. Before the re-bar is buried loosen it with the hammer by hitting the re-bar on the side that is above the ground. Pull the re-bar out and now pound in your stake.
Making your own re-bar stakes.
You can make re-bar stakes by bending lengths of re bar into a U shape at the top of the stake. Slip over each end of a 2′ lengths of re- bar 3 or 4′ sections of steel pipe and then by holding on to the ends of the pipes bend the bar.
Avoid rebar friction
Strong wind pushing and pulling on the dome, will cause the stake cord to rub up and down on the ruff re-bar (like a saw blade) there by cutting through the cord. The way around this is to tie the base clip cords to the re-bar with sections of 3/8″ or thicker cord. (The clip cords that we provide with our domes are only 1/8″ and are designed for the plastic stakes not re-bar.
Long, very strong, Foundation Stakes for soft or rocky ground. Another way to create longer and 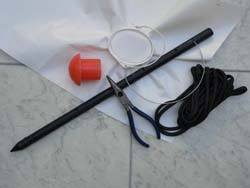 much stronger stakes buy foundation stakes from your building supply store, galvanized steel wire, 1/4″ nylon cord and plastic end caps for
 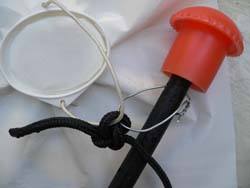 the stakes.
These stakes are available in lengths from 18″ to 4 feet. Use pliers to create a loop through the top most hole in the stake. Twist and then bend then ends of the wire so they will not cut the cord or you.
Use a small sledge hammer to drive the stake into the ground till only the top 4″ is protruding. Use the 1/4″ cord to tie the wire to your domes bottom clip cords.
Now most importantly put the plastic end cap on the top of the stake as you can do great harm to your feet with our this cap. If the cap is knocked off be sure to replace it.
Always incorporate a strong bungee cord into your guy lines. By “strong” we mean a bungee that you can just barely stretch when you 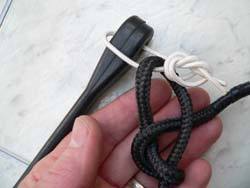 pull on it with both hands if you can not find ones that strong then tie a weaker one into a loop or joining one or more together. Tie one end each guy line to a bungee and then tie the other end of the bungee to a secure stake.
Guying: In wind, always set 4 to 12 guy lines. Run a line from the clip cords (if you tie to poles the wind will pull out the poles) to trees, stakes, large rocks or buried objects in the soil. In high winds check guys and anchors frequently, adding more if necessary.
Even if you anchor your dome well, extreme wind can rip the guy line clips off your cover and poles off your dome and your dome will fail.
If you expect a storm with strong winds, consider removing the lower 12 poles, leaving the dome anchored. Then run strings back and forth across the dome, going from stake to stake to keep the wind from lifting up on the covering. If the dome still appears to be buffeted excessively by the wind, remove the remaining poles and lash the covering to the ground again by running strings back and forth from the  anchors. When the storm passes, put the dome back up.
The best way to anchor a dome when you only have asphalt to set-up on. If you can drive steel stakes into the asphalt then use the instructions above in the manual for staking using “foundation stakes”. If you are not allowed to drive stakes into the asphalt then use large water containers ( 55 gal plastic drums) as anchors at each of the domes lower anchor clips (12 drums on the 14′, 18′ and 20′ and 20 drums on the 30′ Attach 3′ by 3 ‘ sections of tarps to the bottom Grip Clips of the dome with a heavy duty Grip Clip ( when attaching this Heavy Duty Clip – layer in 3 additional 10″ by 10″ patch layers of tarp – this added thickness should assure that the Grip Clip you are attaching does not slip on the tarp sections). Check to see that the clip does not slip. Set the empty drums over these attached tarps and then fill the drums with water. Test to see that you can not pull the tarp out from under the drums. Tie these clips securely to the domes anchor clips. The dome may be held down with a sufficient number of sand bags tied to the domes anchor clips and weighting down the domes skirt but this will require a very large number of bags. Do NOT underestimate the strength of the wind. If you can move the anchor clips they are NOT secure and your dome could blow away or cause extreme damage
Wind and Snow Warning
Shelter Systems’ Domes are stronger for their weight and cost than any other structure. Still they are light weight portable structures and as such are not designed to hold unusually strong wind, year round wind or much snow.
When possible, avoid exposed hilltops and narrow valleys where wind speed increases. Trees and  brush between you and the wind help protect your shelter. If you do not have natural protection from the wind you can create a wind screen out of straw bales. Your dome could be destroyed in extreme weather and your life or safety could be at risk. In heavy snow or wind your dome could collapse, damaging what you have or compromising your shelter. Do not rely on your dome as your only shelter. Accumulated snow, must be melted or shaken off.
Just as you would not expect to be able to climb up on top of your dome and have it hold you, it will not support much snow. If you plan to use your dome in the snow you will need to knock off the snow periodically or melt it off with heat from with in the dome. If the dome should collapse some poles may brake (these are easy to repair or inexpensive to replace) with unusually little or no damage to the covering. However items stored inside could be damaged by the weight or melting of the snow.
The covering will have a shorten life in areas that have constant winds. The dome’s covering can fail or the covering be ripped from the clips in extreme wind.
If your dome is free from its anchors it can tumble and blow away and possibly collide with and damage people or property. Do not let your dome get away from you anchor it well.
Even if you anchor your dome well, extreme wind can rip the guy line clips and poles off your dome and your dome will fail.
WARNING: Your Yurt Dome shelter could be destroyed in extreme weather and your life or safety could be at risk. In heavy snow or wind your Yurt Dome could collapse, damaging what you have or compromising your shelter. Do not rely on your Yurt Dome as your only shelter. Accumulated snow, must be melted or shaken off periodically. Do not set your Your Dome under a tree or branch that might fall on you. Keep all flames and heat away from your Yurt Dome’s covering and objects in your yurt dome.
Net Doors (Optional): If you ordered net doors with your original order, they are already installed and function just like your  fabric doors. If you got them from us later, you can install them yourself. You will tie the upper two corners to the dome clips over the door. There are holes on the interior of the clips on your dome for this purpose. Thread the string through one of these holes on each of the clips. Pull the string up as short as you can get it and tie.
The door poles that came with your dome can be switched back and forth from the fabric doors to the netting doors in seconds when needed. For a full net opening, transfer both ends of the pole to the plugs on the net door and roll your fabric door out of the way. To ensure that there are no vertical gaps where the bugs can fly in, make sure your door opening is adjusted properly. Moving the stakes toward each other 3″ or so will help the doors fit right. You want the door opening narrow enough so that the netting will fit with excess along the edges to seal out the bugs. Secure the net to the side of your door opening with binder clips .
 An alternative to binder clips is sticky back Velcro. Make sure the netting and tent covering are clean and dry before applying the Velcro.The one way to attach the Velcro to your net doors is to first secure the net closed with the bottom clip hooks. Use a marking pen to mark where the edges of the netting contacts the sides of the tent. Lift up the net and get it out of your way. Now measure and cut a length of “hook” Velcro long enough to secure one of the door’s edges. Remove the protective strip from the sticky back and apply this Velcro to the inside of the mark you have made on the side of the dome. Repeat for other side. Take two lengths of “loop” Velcro and Velcro them to the “hook” Velcro that you have already attached to the sides of your tent. Remove the protective strips from these. Now carefully lower and hook your net door o the base of the dome. Press the netting to the exposed sticky of the Velcro. Rub well to secure the bonding of the glue to the netting and the sides of your Yurt Dome.
Keeping Cool: Try to set your dome up under the shade of a tree, however; do not set it under a tree or branch that might fall. If no tree is available, use one or more of Shelter 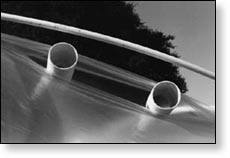 Systems’ SunShades (see below) or 90% shade cloth. Do not use black plastic because it will heat up in the sun enough to cause the poles underneath it to soften and bend. Be sure the sunshade (see below) is on tight. In hot weather keep all your doors open, preferably without the netting (if bugs are tolerable), since the net slows the air flow. Turn the dome so the doors face towards the prevailing breezes. This structure is shingled; panels overlap like roof tiles.
Vent Tubes: For excellent upper ventilation invert the Vent Tubes (see photo at right) provided and or other light objects, like empty soda cans in between the overlaps. The fabric will grip them and hold them. Air can move in and out. The more you open up your dome to air flow, the cooler it will be. Start by putting them in the seams dividing the panels of the ceiling and the upper wall panels. This will let the hot air out of your dome and allow cool air to replace it. You can secure the vent tubes against the wind with a binder clip.
If insects are a problem use sticky back Velcro to attach a strip of netting approximately 18″ by 5′ to the inside of the upper shingle of tent fabric where you plan to place your Vent Tube. Do this so that the netting hangs down on the outside of the Yurt Dome’s cover. Then when you insert the Vent Tube the netting will cover the opening and protect the interior from insects. If and when the bugs are not a problem you can un-Velcro the net and store it. In windy conditions you can use sticky back Velcro to attach the hanging part of the net to the lower shingle. Make sure the netting a tent covering is clean and dry before applying the Velcro.
Open Arch Form of your Yurt Dome
If your dome is still hot, a large cooling opening can be created by removing the poles  under one of the pole arches on the side of your yurt dome and then tying up the canopy to the arch. You will first need to undo one Grip Clip from the strip at the base of two adjacent doors, then apply the Grip Clips back on to the dome. Run the strings from the inside of the dome, where there are holes on the inside of the clips, to the outside clip strings. This should drastically increase ventilation, but it will also weaken the dome in the wind. This opens your interior space to the outdoors, greatly helping to keep your dome cool. It also makes a wonderful display space for public events.)
To open the arch on the Bubble Dome: The Bubble Dome has only one door there for you will need to remove two clips to simulate another door along the arch away from the existing door and then reattach them with their connectors to the dome’s side (this is so that the arch pole can be reinserted). Now the covering under the arch is free to be rolled and tied up.
Instructions for Attaching Grip Clips to Sun Shades
Parts: Sun Shade cover, 4 Grip Clips, 4 – 12′ cords. Attach one cord to ring part of 4 Grip Clips. Using the Clipping Instructions at the end of your manual attach one clip to each of the corners of your Sun Shade. Clips should be about 3″ from the edge. Follow the instructions below for attaching Sun Shades
SunShade (Optional): Shelter Systems offers white/black sunshades. The white on the outside reflects the heat of the sun while the black on the inside blocks the sun and provides shade. The spacing between the SunShade and the dome allows air to flow and dissipate heat that is absorbed by the SunShade. The Sun Shade comes with 4 General Purpose Grip Clips, and attachment cords. To attach Sunshade, first tie the cord from one corner of the Sunshade to your dome . Then walk around the dome, pulling the shade over the dome. Take care that the white side is out. Tie this corner down. Tie the other two corners of the shade to the dome. It is important for the sunshade to be kept tight, because you need that cooling airspace between it and the dome itself. If over heating is likely a problem consider two or more SunShades. Arrange your Sun Shades such that they do not overlap each other completely. The airspace under the shades and the gaps between the shades will allow heat to be dissipated and escape rather than be reradiated back into your dome.
Staying Warm: Remove the sunshade to let in the sun’s warmth, if you have one. Use a propane, electric radiant heater or wood stove to heat your dome. Take precautions to keep all heat sources from your tent walls. A full interior wall liner with windows is available from Shelter Systems, which will dramatically increase the warmth of your dome. A liner reduces heat loss from radiation, conduction and convection, and creates an insulating dead air space of 2″-3″. It also helps prevents condensation which may occur in very cold situations. One option you could consider in more permanent situations is the use of rigid foam insulation between the layers. This is acquired at a building supply store. You simply cut it into the same geometric shapes as your dome’s panels and insert it panel by panel as the liner is tied in. Although this is not necessary in order to be comfortable in your dome, you will use less fuel and will experience more even temperature.
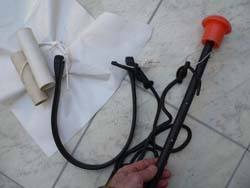
Stove Installation: Place your stove a safe distance from the tent wall on a certified fireproof mat or bricks. When deciding what height to have your stove pipe going through the wall, keep in mind all stovepipes must be at least 18 inches from all tent poles. This means your horizontal stove pipe must be low enough, as well as long enough to keep the vertical sections of pipe a safe distance from the poles; otherwise they will melt. Here are two ways of preparing your dome for stovepipe installation. One is to simply run the chimney through a mound of earth which is approximately 10″ higher than the stovepipe and is positioned in the doorway. (The door is lowered on top the mound of earth.) The second technique uses a plywood panel. To do this, roll up one of the doors and tie it so it stays safely out of the way. Cut a piece of plywood that is the same shape as the door opening, but slightly bigger for a tight fit, and drill a small hole in the upper two corners. Shingle this in place by propping it into the door opening with the top edge inside the dome and the bottom edge outside the dome. Tie the upper two comers to the nearest interior clips. Keep all flames and heat away from your dome’s covering and other objects in your dome. If possible have your stove pipe come out the back of your stove and pass through the plywood wall. If your stove pipe exits your stove at the top then place an elbow as close to your stove as possible.
 Attach a horizontal section of pipe to this elbow and pass this pipe through the wall such that it will slant slightly down towards the outside. This will keep rain from following the pipe and dripping inside your dome. We recommend using insulated stovepipe throughout. Place an elbow on the outside. Attach a vertical pipe on the outside pipe and a spark arrester cap on top. Use steel wire to support and stabilize the pipe outside the dome. Loop it around the elbow so it lifts and supports the weight of the horizontal pipe. Another wire will be needed around the vertical pipe to keep it upright and stable in the wind. Tie the other ends of the wires to the dome and or attach them to wooden poles driven into the ground. The wires should be tight enough to lift the horizontal pipe so that it is centered through the hole in the wall and not touching the fabric. Local codes may require other installation procedures.
Carefully follow the instructions given with your heater. It is best if you can get a vented heater so that combustibles are expelled from your dome. When a fuel is burn it produces water vapor which will add to the dampness of your space; and carbon dioxide which can suffocate you if you were in an airtight room. The other reason is the fumes which the heater produces can smell and if burnt incompletely produce carbon monoxide (this not the carbon dioxide we mention above but more dangerous and can kill you. Now there are heaters which claim to be safe with out being vented. Read and follow their directions.
Liner (Optional): The interior wall liner is installed after your dome is set up. Unroll the liner inside the dome. Locate the liner’s center clip that is marked with a ribbon. Tie the string of this center clip to the top center ceiling clip of your dome. This is done  by threading the string into one of the two holes and pulling the string back through the big center opening in the domes inner clip. This is easier if you use a tool like a crochet hook or a needle nose pliers to grip and pull it through.
Pull the string as tight as you can without deforming the dome’s outer cover. Then knot. Turn the liner until the doors of the dome match up with the doors of the liner. Now proceed to work down from the top. Be careful not to miss any clips since it is hard to reach them later on. The lower clips at the liner’s edge can be moved up before tying if necessary to get the liner nice and tight. Simply unclip them and clip them back on a little higher on the material, adjusting the tension.
Dividing your dome Shelter System’s Yurt Domes can be easily divided into rooms with fabric you provide or some of the same woven ripstop material that Shelter Systems’ makes it Yurt Domes out of.
First, get enough fabric. If you plan to divide your dome in half get or sew a 6′ wide piece with a length equal to the diameter of your Yurt Dome. If you plan to divide your dome in quarters then get two pieces this size. Purchase 7 Grip Clips to attach your fabric if you are dividing your dome in half. Purchase 14 Grip Clips to attach your fabric if you are dividing your dome in quarters.
Fold the divider in half length wise and make a small mark at the fold on the edge. If you are dividing your dome in quarters lay out both dividers on on top of each fold in half and make a small mark the top and bottom edge at the fold. Open out the divider(s). If dividing your dome in half attach one clip at the edge mark “E. If dividing in quarters then attach a clip at “E” and “F” clipping the two dividers together at  the center fold.
Next attach a clip point to point “A” on the divider and tie it to the dome’s ground clip which is equal distance between two adjacent doors. Stretch divider across dome and attach a clip at the other point “A” on the divider so that when the divider is tensioned and tied to the dome’s ground clip it will stretch tight across the floor of the dome. Have two people hold up and tension the divider so points “B” can be marked, clipped and tied. Run a cord up clip “E” and tie it to the top of the dome to support the middle of the divider. Have two people hold up and tension the divider so points “C” can be marked, clipped and tied to the dome at points “D”. Move the clips on the divider if needed so that the divider is tensioned evenly.
 If you are dividing your dome into quarters the first tension and tie your four way divider so as to divide the dome in half then pull out and tension and tie the quarter sections.
Note that once installed each divided space has two doors. If the divider is set up as above each 1/4 side will have 1doors.
You can make the divider in half sections that are clipped in the middle with two tie clips down the joined edge. There is two advantages to this configuration. One is that it saves some fabric since we can cut two halves so that one is flipped and nestled next to the other. The other advantage is that the tied closed seam could act as a door to get from one half to the other.
How “hang” liners, net doors, dividers, floors and decorate inside your dome? 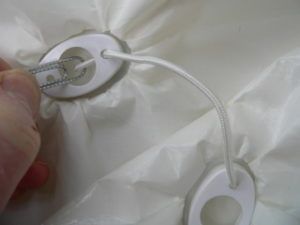
When you go to tie in the liners, net doors, divider and and the floor a paper clip (large is best) or small bent piece of wire will be helpful in threading their attaching cords to the inside clip holes on the dome. See photo: the clip on the left is the inner clip of the dome; the clip on the right is the accessory with cord attached. The paper clip is used to pull the accessory’s cord through the dome’s inner clip hole. The cord is then knotted. Although the threading can be done with out the paper clip tool makes it easier.
Instructions for Attaching a Door to Door Connection Strip
Parts: Strip 3′ by 16′ for 18′ dome or yurt, 8 Grip Clips, 8 clip cords. This strip when attached properly will join two dome doors tightly and create a gutter between them that redirects water to the base outside the domes.
On a windless day set up two domes next to each other such that two doors are facing each other. Roll up and tuck the two door coverings over the poles at the top of the doors. Move the domes together so that the base of the door openings touch each other. Follow carefully the instructions in you manual to secure your dome to the ground using all means necessary.
1) Knot end of each cord. Feed the un-knotted end of the cords through the concave side of each the “button” ends of the clips. Using the Clipping Instructions at the end of your manual attach two clips to the center end of the connection strip about 8″from the end, such that these clips are about 4″ from each other.
2) Enter one of the domes and lay out your connection strip under the two door openings so that the button clip cords are to one side and centered in the door ways. The cords should be facing up and close to one of the sides of the openings.
3) Slip and tie tight one of the connector clip cords through the clip hole at the base and inside the doing closet to that clip. Repeat this with the other button clip cords inside the other dome. You will now have join these two domes together with the connecter strip.
4) Keeping the connector strip centered and tight apply two clips to the connector strip so that the button cord is on the same side of the strip as the first two clips and such that when these two clips are tied to the inside upper clips of the two, they pull the connector strip tight and centered. You may need to remove and reposition these two clips to get the connector strip tight, centered and even.
5) Next proceed to do the same for the next two door way clips. Keep the strip centered and tight.
6) Finely, secure the remaining two base clips. The connection strip should now be secured tight to the walls inside both domes creating an air closure and water tight connection.
7) You may carefully trim excess material from the strip.
8) If your soil does not drain well then make a ditch around your dome to direct water away from the domes.
9) If you need to make more connection strips you can remove the one you have fitted and use it as a pattern to make other strips.
Vestibule Attaching a Water Tight Vestibule or Porch to Your Yurt Dome™ Making a porch from a tarp.
Porch (Optional): If you ordered a porch along with your dome, you’ll find the two porch support poles taped together. The support poles are the same length as the dome poles but have a hole drilled in each end. Find also 16 poles that are a smaller diameter and shorter than your dome’s poles. Spread your porch cover out on the ground so the connectors are facing up. Begin inserting poles into the connectors.
 Start from one edge, working your way toward the opposite edge. As more poles are added the material will tighten, requiring that you bend
  the poles and pull the connectors on the ends of the poles. At each intersection your poles must form a cross. When under tension the porch wants to form an arch. If you pull on the sides of your porch, you will see that it can “pop” back and forth from a long, narrow tunnel shape to an arch that covers an approximately square area. It is in this square position that it will fit your doorway as a porch roof.
 Tie the corners of the porch to the long poles that extend horizontally on either side of the triangular window over your door.
Tie to the clip strings on the porch rather than to the porch poles on the for maximum security in the wind. Now tie the two long poles with holes in there ends to the clip strings on the front of the porch and to stakes at their bottom.
Deck Building:
 We include the following ideas on deck building only as such. Always consult with an experienced carpenter so that your deck will turn out right and be safe.
These plans are for a 20′ Dome. If your Dome is larger or smaller adjust the measurements and the size of the wood you use. It is assumed that your land slops slightly. If our land is flat it will be even easier to build a deck.
Set your first pier block at the approximate center of where you want your dome to be.
10 feet up the hill from #1 set your #2 pier block. Using a string or tape run a straight line from #2 through the center of #1 and 10 feet more to set 3 #. 90 degrees to this line set piers #4 and #5.
Use a clear 1/2″ vinyl tube 25′ long as a level (fill the tube with water 6″ from each end – hold one end beside and above the #2 and the other end beside and above the #3 – the water in the tube will make the level) pull a string tight to mark this line and the 4″ by 4″ attached to #1 and #3
Using steel brackets attach the a 4″ x 4″ to the #3 pier block. Support the 4″ x 4″ with at least 3 temporary 2″ x 2″ to hold it vertical (use a level or plumb line to make it vertical).
Now attach a 20′ 2″ x 6″ using steel brackets to the #2 and #3 blocks. Add two 10 foot 2″ x 6″ again using the leveling tube and the plumb line.
 Add four more pier blocks “W, X, Y. Z” Place the other pier blocks by adding a 10′ long string at #1 and using your tape measure to mark off 2′ 4′ 6′ and 8′. Use your tube level and plum line to secure the 4″x 4″s. Then attach your 2″ x 6″s.
 Brace at least every other 4″ x 4″.
 Proceed to add the other pair of blocks and 2″ x 6″s use in joist hangers. Nail in 2″ x 4″s, again using joist hangers, to support the middle of the 4′ x 8′ plywood. Nail or screw on 3/4″ plywood.
Let the plywood over hang the outer edge of the joists by about 6″.
 Set your dome on the plywood.
 Turn the dome how you want it attach it temporally at the pole end with nails to pull the dome edge tight.
With a pencil make a line on the inside of the dome to follow the edge of the dome.
Remove the dome. Using a saw cut the decking to the line.
Bolt sections 2″x 4″ to the plywood so that they extend beyond the plywood to support the domes pole ends. Tie the clip cords at the pole ends to eye bolts in these 2″ x 4″s.
Adding height: The strongest way to add a 2 feet to the bottom of the dome is to first:
Tie pairs of pole connectors to 20 new HD clips.
Unclip the 20 plug clips with the single pole plugs at the base of your dome.
 Add and shingle a skirt of material to the bottom that is wide enough for the height you need + 1.5′ using the 20 clips with connectors you have just assembled.
Clip the plug clips along the base of the added material allowing 11″ for a skirt 2′ directly below the connector clips.
Cut and insert 20 new full length poles to create the ring around what was the base but soon will be 2′ above the ground.
Cut and insert 20 new short poles to your added extension. Choose a length so that the tension on the covering is the same as the tension on the main part of the dome. These short poles are difficult to install because you can not bend them. It will be easier to install them if you first remove the vertical pole above it; insert the short pole then reinsert the long pole; or use a pulley system to tension the base clip cords with extra long cords after adding the poles to clips .
Stake out.
This will maintain the integrity of the structure and only weaken it slightly.
Note that in this photo there is no skirt added. The skirt is necessary to stabilize the added poles. With out the skirt the dome will be blown over in the wind.
Storage: Brush off all the dirt that you can. Make sure the dome is completely dry. If you have to take the dome down wet, plan to hang it  indoors from the top clip until it’s dry before packing. Remove stakes, vent tubes and poles. The liner may stay attached. We’ve found the following folding technique to be the easiest. Lay the dome on its own floor. Put one stake in the ground, to use as an anchor during folding. Hook the clip string at the very top center of the dome to the stake. Pull all the dome’s edges so that it fans out and lies flat, one half on top of the other half. Then pleat-fold it so that the canopy forms a narrow triangle 4′ wide at the base. Try to get each fold as flat as possible. Slip the tip of the triangle off the stake now and begin rolling it tightly down toward the wide end until you’ve got a nice bundle. Clean and dry both sides of the floor. After the floor is dry, fold it into a 4′ wide strip. Lay the tent roll and other small parts at one end and roll the whole thing up tightly. Wrap your dome in the material you received it in and use strings to hold the roll tight.
Now tie the poles into a bundle. To get it nice and tight, wrap string twice around the bundle of poles and use a packer’s knot. This is a kind of slip knot that holds tight.
You can use a house vacuum to compress your packed dome to about 1/2 its volume; roll and pack  up your dome as above; warp in its wrapper it came with; tape the long seam of the wrapper; tape any holes in the wrapper. twist one end tight and then fold and tape this twisted end to the package; insert your vacuum hose in the other end twist and tape it tight; turn on your vacuum; with the vacuum on push on the package and it will compress to about 1/2 its original size; now tape around and around your package with the vacuum still on (this is to hold the package compressed when you remove the vacuum. now remove the vacuum and tape the end of your package closed.
Repairs: Your yurt is designed to be durable and problem free. However, some of our customers use their structures for so many years that eventually they need some maintenance. A broken pole can be repaired with a wooden insert such as a piece of broom handle or a straight stick. Poles can usually be obtained from a building supply or plumbing store. Ask for class 200, class #125 or schedule 40 will also work. Poles may also be ordered from Shelter Systems (send length and size).
Broken connectors can be replaced with class 200 PVC (1-1/4″ for the 20′ and 18′ domes and 1″ for the 8′, 10′, 11′, and 14′ domes). The simplest way to repair a hole or cut in the covering is to cut a patch from the material the dome came wrapped in. Use 100% silicon rubber to glue your patch on the outside of the tear. If the tear is small you may be able to plug it up with a blob of silicon rubber alone.
If a clip is torn free of the covering or if a tear is immediately adjacent to a clip you can patch the tear with a patch cut from the skirt of your dome or the wrapping material that your yurt came in. Use a patch about 12″ square, if this is sufficient to completely encompass the torn section with at least a 2″ overlap on good sound material. This will allow you to spread the stress that the Grip Clip generates over a large # of stitches. Make your stitches about 1/8″ long using doubled cotton covered polyester button thread. You do not have to remove the torn section of the covering. Preferably, but not absolutely necessary, glue the patch in place first with 100% Silicon Rubber bathroom caulk first, as this will make the sewing somewhat easer and provide a better seal. You will then have to wait while the glue sets which takes about 12 hrs. Make sure the covering is clean and dry before gluing. Press the glued patch between two heavy flat objects such as large books or flat rocks. After you set up the shelter you can apply Silicon Rubber to the now stressed seams to seal them and along the edge of the patch if you did not already glue the patch.
Alternatively you can replace a whole panel if a tear is immediately adjacent to a clip. Order the same panel from Shelter Systems. 1) Arrange the replacement panel over top of the damaged panel so that it is in the same orientation.2) Remove only one clip from your dome being careful not to disrupt the layering sequence of the panels on your dome. If you can not get the clip off use a pliers and brake the ring part of the clip (you will receive 4 extra Heavy Duty Grip Clips with each replacement panels). 3) Take your time to carefully slide out the corner of your damaged panel and insert your replacement panel into the same layering sequence as that of the damaged panel. 4) Now with all layers in the same order and orientation as before; gather these tightly around the male clip and slip over the female clip as described below. When many layers are involved as is the case with the corners of the windows, attaching the female clip can be difficult; practicing on scraps and making the layers warm with the sun or heat lamp (be careful not to melt the covering by getting it to hot) can help. If your dome is flattened by snow, carefully remove the snow without tearing its covering. You may find it will pop back up or that you have to remove some of the poles and set up again. Replace any broken poles.
Attaching Grip Clips™: 1. Wrap material over Smaller Button part with its flared side facing up as shown.
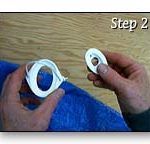

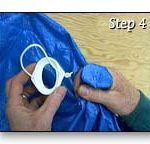
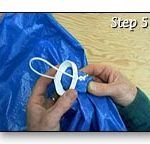
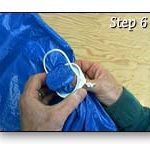
2. Slip Button through Ring. 3. Turn the Ring so that the Button seats snugly into the locked position.
4 Removal of a clip is just the reverse procedure.
WARNING: Your Yurt Dome shelter could be destroyed in extreme weather and your life or safety could be at risk. In heavy snow or wind your yurt could collapse, damaging what you have or compromising your shelter. Do not rely on your yurt dome as your only shelter. Accumulated snow, must be melted or shaken off periodically. Do not set your yurt dome under a tree or branch that might fall on you. Keep all flames and heat away from your yurt dome’s covering and objects in your yurt dome.