1) Unroll cover so that connectors are upward. For safety wear eye protection and gloves. Have two strong people help you to bend the poles when inserting them into the connectors.
2) Start at one end of the cover adding long poles to the small plugs and connectors working your way to the other end. The larger connectors are used to join poles along the long sides of your cover.
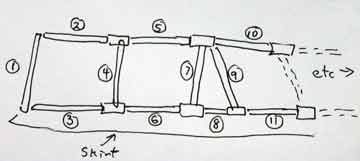
3) Note: short pole (8) and skirt at the ground level of the WindWall.
4) Stake out the base of WindWall at each pole crossing.
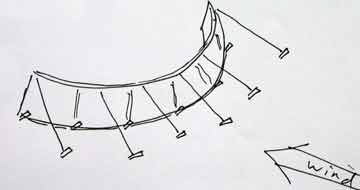
Set guy lines at each pole crossing.
Test stakes by pulling up on them. If you can pull them up then you will need to make and use longer stakes.
Anchoring: Wear gloves and eye protection. Your WindWall is no stronger than its anchors, so it is important to anchor it securely. We have provided you with short cords so you can drive your stakes deep. Tie them to the base of the attached Grip Clip ™ strings around the perimeter of your Wind Wall. You now have a long loop to pull out and drive your stake through. To assure the Wind Wall’s edge is an even tight arc, place stakes lightly at every other pole base. Then go around pulling, tightening and adjusting the circle, driving the stakes deep after adjustment. Add the remaining stakes. If the stakes we have provided go into the ground easily, then this type of soil requires longer stakes. Make stakes from 2″x 2″ lumber with a hole 2″ from the top. Logs or sandbags filled with sand or gravel work and can be buried for extra security in soils too loose for your stakes to work.
Check your stakes frequently (since ground conditions can change when wet) by pulling on them. You should just barely be able to pull them out. To anchor to adeck, use eye bolts attached to the 2″x 6″s set below the level of the deck.
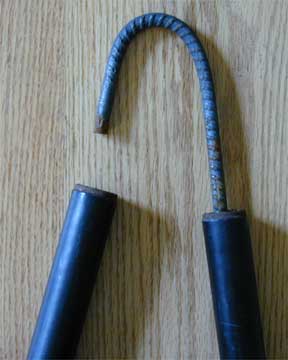
Wind over time will cause your tent to move up and down and side to side therefore your ground stakes need to be checked frequently to see if they are working loose Check to see that the cords you run from your tent to the stakes does not become frayed by this friction. If you use re-bar as stakes make sure the ends of the re-bar are covered with bottles or preferably bent into a “U” shape so you will not cut your foot or leg on the exposed bar.
Anchoring into rocky ground:
Wear gloves and eye protection. With a one foot section of re bar or a 10″ or 12″ “spike” (large nail) and a heavy headed hammer pound the re-bar or nail into the ground where you want to place your stake. Before the re-bar is buried loosen it with the hammer by hitting the re-bar on the side that is above the ground. Pull the re-bar out and now pound in your stake.
Making your own re-bar stakes.
You can make re-bar stakes by bending lengths of re bar into a U shape at the top of the stake. Slip over each end of a 2′ lengths of re- bar 3 or 4′ sections of steel pipe and then by holding on to the ends of the pipes bendthe bar.
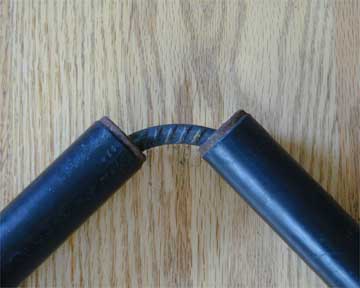
Avoid rebar friction
Strong wind pushing and pulling on the dome, will cause the stake cord to rub up and down on the ruff re-bar (like a saw blade) there by cutting through the cord. The way around this is to tie the base clip cords to the re-bar with sections of 3/8″ or thicker cord. (The clip cords that we provide with our domes are only 1/8″ and are designed for the plastic stakes not re-bar.
Guying: In wind, always set 4 to 12 guy lines. Run a line from the clip cords (if you tie topoles the wind will pull out the poles) to trees, stakes, large rocks or buried objects in the soil. In high winds check guys and anchors frequently, adding more if necessary.
Even if you anchor your dome well, extreme wind can rip the guy line clips off your cover and poles off your dome and your dome will fail.
Consider incorporating a strong bungee cord into your guy lines. By “strong” we mean a bungee that you can just barely stretch when you pull on it with both hands if you can not find ones that strong then tie a weaker one into a loop or joining one or more together. Tie one end each guy line to a bungee and then tie the other end of the bungee to a secure stake.
If you expect a storm with strong winds, consider removing the lower 12 poles, leaving the dome anchored. Then run strings back and forth across the dome, going from stake to stake to keep the wind from lifting up on the covering. If the dome still appears to be buffeted excessively by the wind, remove the remaining poles and lash the covering to the ground again by running strings back and forth from the anchors. When the storm passes, put the dome back up.
Wind and Snow Warning
Shelter Systems’ Domes are stronger for their weight and cost than any other structure. Still they are light weight portable structures and as such are not designed to hold unusually strong wind, year round wind or much snow.
When possible, avoid exposed hilltops and narrow valleys where wind speed increases. Trees and  brush between you and the wind help protect your shelter. If you do not have natural protection from the wind you can create a wind screen out of straw bales. Your dome could be destroyed in extreme weather and your life or safety could be at risk. In heavy snow or wind your dome could collapse, damaging what you have or compromising your shelter. Do not rely on your dome as your only shelter. Accumulated snow, must be melted or shaken off.
Just as you would not expect to be able to climb up on top of your dome and have it hold you, it will not support much snow. If you plan to use your dome in the snow you will need to knock off the snow periodically or melt it off with heat from with in the dome. If the dome should collapse some poles may brake (these are easy to repair or inexpensive to replace) with unusually little or no damage to the covering. However items stored inside could be damaged by the weight or melting of the snow.
The covering will have a shorten life in areas that have constant winds. The dome’s covering can fail or the covering be ripped from the clips in extreme wind.
If your dome is free from its anchors it can tumble and blow away and possibly collide with and damage people or property. Do not let your dome get away from you anchor it well.
Even if you anchor your dome well, extreme wind can rip the guy line clips and poles off your dome and your dome will fail.
WARNING: Your Yurt Dome shelter could be destroyed in extreme weather and your life or safety could be at risk. In heavy snow or wind your Yurt Dome could collapse, damaging what you have or compromising your shelter. Do not rely on your Yurt Dome as your only shelter. Accumulated snow, must be melted or shaken off periodically. Do not set your Your Dome under a tree or branch that might fall on you. Keep all flames and heat away from your Yurt Dome’s covering and objects in your yurt dome.