Your Shelter Systems’ GroRow Greenhouse will, within 15 minutes of your receiving it, begin to serve you. Start seedlings, overwinter plants, store tools and bikes, dry firewood, etc. Shelter your plants from cold, rain, wind, frost, and birds. Start plants sooner in the spring and keep them growing later in the fall.
GroRow Greenhouse is made entirely of translucent greenhouse fabric. The GroRow is lightweight which means you can move it around easily. Clips with cords are provided to attach your GroRow Greenhouse the ground or to your fence or wall.
Parts List:
- Canopy
- GroRow Poles
- Stakes
Warning: Wear eye protection when setting up your dome. The dome’s poles could break and parts of the pole could fly toward your face. Wear gloves to protect your hands.
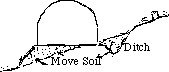
Site selection: Carefully select a site for your GroRow. Take time to look around for the best drainage, wind protection, sun and shade exposure, and a level and smooth surface.
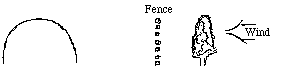
Wind: Your GroRow is a lightweight structure, therefore extreme wind sites are not recommended. When possible, avoid exposed hilltops and narrow valleys where wind speed increases. Trees and brush or bales of hay between you and the wind help protect your shelter.
Drainage: Ideal drainage occurs when rainwater can flow down and away from a raised site. Flat land can be improved by building a platform or mounding up a section of ground to set the GroRow up on. A sloped terrain can be leveled with a platform or by moving earth. This gets your GroRow onto a flat spot, but a ditch is essential on the uphill side of the GroRow so run-off water can drain into it, around your floor and on down the hillside.
If you are using your GroRow as a greenhouse, a floor is not needed. If you are using your GroRow as a shed, plan to use a waterproof floor. A vapor block keeps the dampness of the ground from entering the space and condensing on the GroRow’s walls. If you do not purchase a round floor from us, you can make a good floor from the blue rip-stop tarps sold at hardware, building and outdoor supply stores. Black 6 mil. polyethylene tarps will also work but are not as tough.
Assembling Your GroRow™
When putting up the SolarShed for the first time, wear leather gloves or be careful not to pinch your hands when the poles snap into the connectors. Consider having a friend help you the first time you set up your GroRow.
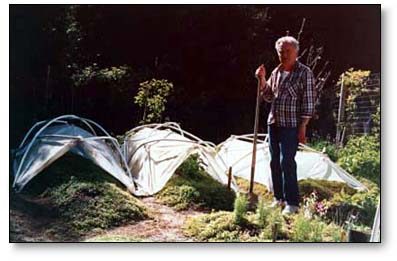
Unroll the GroRow. Spread it out on your prepared site so the GroRow’s connectors are visible and the uppermost. Take the poles and begin inserting them into the connectors located on the silver top section.
Begin inserting poles into the connectors. Start from one edge, working your way toward the opposite edge. As more poles are added the material will tighten, requiring that you bend the poles and pull the connectors on to the ends of the poles. At each intersection your poles must form a cross.
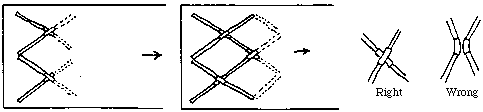
When under tension the porch wants to form an arch. If you pull on the sides of your GroRow, you will see that it can “pop” back and forth from a long, narrow tunnel shape to an arch that covers an approximately square area.


Anchoring:
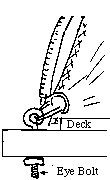
Your GroRow is no stronger than its anchors, so anchor it securely.
If the stakes we have provided go into the ground easily, then the type of soil you are situated on requires longer stakes. They can be made from 2″x 2″ lumber with a hole 2″ from the top. Logs or sandbags filled with sand or gravel work also and can even be buried for extra security in soils too loose for your stakes to work. We have even heard of people using metal fence posts. Now, those’re long stakes!
Check your stakes frequently (since ground conditions can change when wet) by pulling on them. You should just barely be able to pull them out.
Two stakes in series is another way to increase holding power against the wind.
CAUTION Snow and Wind : Remember that the GroRow is a lightweight, portable structure. Its strength comes from tension, not mass or rigid components. Exposed sites with unusually extreme winds are not recommended. It is apparent that you could not climb on top of the GroRow, nor can you expect it to support heavy snow loads.
Accumulated snow must be melted or shaken off periodically.
Guying:
If you expect strong winds, consider running guy lines out from your SolarShed’s clip cords (not the poles; the poles can be pulled out of the connectors) to trees, stakes, large rocks or buried objects in the soil. In high winds check guys and anchors frequently, adding more if necessary.
Sunshade (Optional):
If you need to be cooler inside, you can get an ideal sunshade tarp from us: black on the inside, reflective silver on the outside, with a clip on each comer. If you use your own tarp from the hardware store, use porous gardener’s shade cloth rather than black plastic. (Likewise, you should not reverse your black and silver tarp so that the black side is out). The reason for this is that the sun will heat the black material up too much, causing the poles underneath it to melt and bend.
With clips on the comers of the sunshade, you can tie it to the clip strings on the outside of your GroRow.
It’s important for sunshades to be kept tight because you need that cooling airspace between it and the GroRow. If the sunshade material lays on the GroRow, there is no room for any shade underneath it!
Remove the sun shade to let in the sun’s warmth.
Storage:
Brush off all the dirt that you can. Make sure the GroRow is completely dry. If you have to take the GroRow down wet, plan to hang it somewhere indoors until it’s dry before packing. Remove stakes and poles.
We’ve found the following folding technique to be the easiest. Lay the GroRow on a dry place. Pull all the GroRow’s edges so that it fans out and lies flat. Then pleat-fold it. Roll it up until you’ve got a nice bundle.Wrap it in the material you received it in and use strings to hold the roll tight.
Now tie the poles into a bundle. To get it nice and tight, wrap string twice around the bundle of poles and use a packer’s knot. This is a kind of slip knot that holds tight.
Repairs:
Your GroRow is designed to be durable and problem free. However, some of our customers use their structures for so many years that eventually they need some loving care.
A broken pole can be repaired with a wooden insert such as a piece of a broom handle or a straight stick. They can be replaced with I”, class 200 PVC pipe from a plumbing or building supply store. (Class 125 or schedule 40 will also work).
Broken connectors can be replaced with 3/4″ class 200 PVC.(Class 125 or schedule and some times 40 will also work). Cut them to 5″ in length with any kind of saw, and drill a 1/4″ hole in the center.
The simplest way to repair the fabric is to cut a small square from an inconspicuous place from the material that forms the lower “skirt” of the GroRow. If you’d prefer, we’d be happy to send you patch material. This is necessary, of course, if the tear is large. Use silicon rubber glue to glue your patch on the outside or inside of the tear. If the tear is really small you may be able to plug it up with a blob of silicon rubber glue alone.
If your GroRow is flattened by snow, carefully remove the snow without tearing its covering. It is much easier to get your GroRow back in shape if you remove most of the poles and set the GroRow up again starting from the center and working out. The stakes do not need to be removed from the ground. Replace any broken poles. Poles can usually be obtained from a building supply or plumbing store. Ask for 1/2″, class 200. Class 125 or schedule 40 will also work. Poles may be ordered from Shelter Systems (send length and size).
If your GroRow’s site should get a freak storm with extreme winds, consider removing the poles but leaving it staked out. Then run strings back and forth across the GroRow, going from stake to stake to keep the wind from lifting up on the covering. When the storm passes, put the GroRow back up.
Applying Grip Clips:
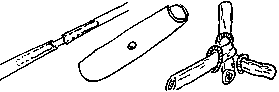
1. Take the male, inner clip part with its flat side facing up and wrap material over it.
2. Take the larger, female ring and slip it over the covered male part. If you orient the ovals perpendicular to each other, when slipping one inside the other, you will not have to force the ring over at all. It should have the cord hole ears upward..
3. Now Turn the female part and so that the male part seats snugly into the locked position.
4. Removal of a clip is just the reverse procedure.